An account of my home-brew escapades.
Super-health beer for the traditional human.
I thought I'd share my quality beer recipe with the world, a few top tips and some advice. In four years I've never had a dodgy beer. I don't mash and boil my own grain into a syrupy goo, that would be madness. I buy a kit can of goo.
A beer kit is normally a 1.5Kg can of goo, known as 'wort'. I choose Geordie Yorkshire Bitter, an excellent amber ale. It's pretty much the same as Geordie Scottish Export or Geordie Bitter. Geordie Lager if you like a hoppier taste, Geordie Mild is for the darker ale admirers. One can will make 40 pints, I squeeze fourty five 500ml bottles of 'super-health' elixir from the can.
A beer kit is normally a 1.5Kg can of goo, known as 'wort'. I choose Geordie Yorkshire Bitter, an excellent amber ale. It's pretty much the same as Geordie Scottish Export or Geordie Bitter. Geordie Lager if you like a hoppier taste, Geordie Mild is for the darker ale admirers. One can will make 40 pints, I squeeze fourty five 500ml bottles of 'super-health' elixir from the can.

My much loved recipe requires a can of Yorkshire Bitter, 600g of root ginger, 1.5Kg of normal granulated cane sugar, 5 limes and 23 litres of water. I've recently created the 'super-health' beer with the addition of 100g of garlic. This complete concoction will give you the immune system of a warrior whilst enjoying the sumptuous, yet snappy brew. The perfect pint during a pandemic.
At every stage, all equipment used is sterilised in my bleach bucket, an unscented bleach solution does the job, just rinse everything thoroughly.
Your kit probably says add 1Kg of sugar, I find that 1Kg gives you roughly a 4% beer and 1.5Kg produces a 5.2% beer, discovered using a hydrometer.
Initially I peel the ginger and garlic, add some water and liquidise it in a blender, then strain it through a nylon net from the home-brew shop. This makes 1.5 litres of potently gregarious ginger and garlic juice which I bottle and freeze. I also squeeze 5 limes, add a bit of water and strain, which creates 0.5 litres which I bottle and freeze..
I now use Isle of Wight tap water which tastes no different to the bottled water that I used to buy. I fill five 5 litre plastic bottles with water and leave for a few days to disperse any chlorine present.
I used to be a member of Hampshire Against Fluoridation, but what's the point of worrying about toxic hexafluorosilicic acid in the water when our food and air is poisoned too.
Thaw out the frozen bottles of lime and gingery garlic the day before beer day. On beer day I get a 1 litre jug, boil some water and dissolve 100g of sugar in 100ml of water in the jug, once dissolved top-up to 500ml with cold water, add the yeast sachet. Stir vigorously to dissolve yeast and introduce oxygen. Cover jug with cling film and set aside.
I use a 40 pint fermentation bin with a snap on lid, sterilise that bin.. Pour lime juice into a large saucepan and heat, slowly adding the 1.5kg of sugar until 20 minutes later you have a bubbling pan of liquid inverted sugar. (This will be hundreds of degrees centigrade!). Keep a constant eye on the pan as it will expand and ruin your cooker and your day. The citric acid in the limes splits the sugar into its simpler forms, which is easier for the yeast to consume later.
Timing is everything. I boil a kettle, scoop the can contents into the bin with a huge metal spoon, pour some boiling water into the can to dissolve the sticky remnants and pour into the bin. Pour remaining kettle contents into the bin.
Pour bubbling pan of lime and sugar into bin and get stirring. Boil another kettle, pour into bin and keep stirring whilst aerating the steaming wort with vigourous spoon action. You need to introduce air into the wort to help the yeast multiply later.
Once everything is mixed, pour in the gingery garlic and stir. (The gingery garlic is optional). At this point, you've done the worst of it, put the barrel / bin into it's final resting position and then add the water. Fill the bin to three-quarters full, add the frothy yeast from the jug, stir in and then finally fill your fermentation bin with water, leaving a gap of 25 - 40mm from the top.
The benefit of the fermentation bin is that you snap the lid on but leave one quarter not snapped on, test the lid's venting ability by squeezing out the air.. When the yeast starts to make alcohol the next day, the lid must be able to vent out the carbon dioxide produced, or things will explode. The upward bulging of the lid will allow you to keep an eye on the activity level.
I wrap the bin in a fleecey blanket to keep the naturally created warmth in, as yeast appreciates warmth. In the summer it takes 2 - 3 weeks to ferment, 3 - 4 weeks in the winter.
Your house will reek of garlic for the first few days, but you can be sure that any resident vampires will be driven out.
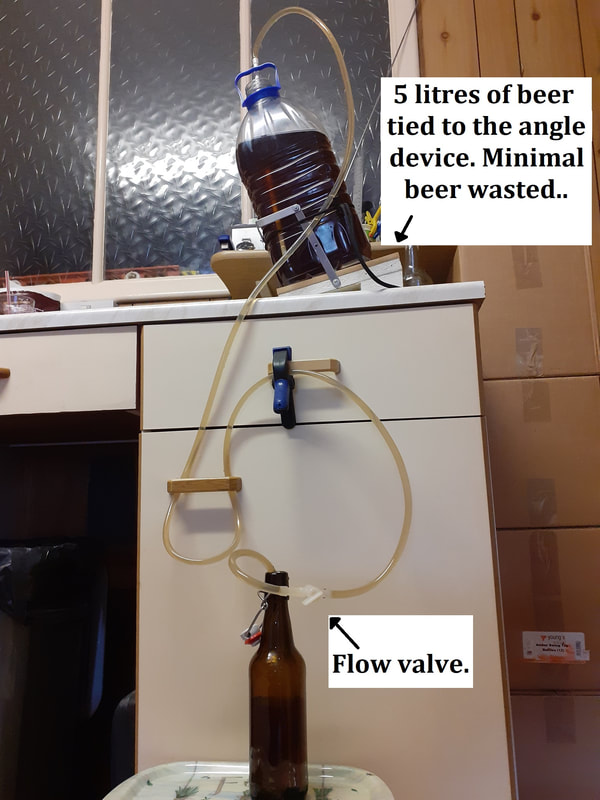
Once fermentation has finished, the next stage is syphoning, you'll need 1.5 to 2 metres of clear tubing (7mm internal diameter for best results), an in-line valve and a rigid siphoning stick to probe the depths of your bin, all available from the home-brew shop. Dunk the tube ends in warm water to soften the tube to fit onto the valve and syphoning stick.
Have the valve at the lowest point by the bottle you're filling, use a 3 inch bit of tube attached to the valve to start the siphoning by sucking with your mouth. Close the valve when beer gets to it, replace the 3 inch bit with a 12 inch bit of tube which you'll insert into the bottles to be filled.
I dissolve 5 teaspoons of sugar into one-quarter cup of boiled water and funnel 2 teaspoons of this liquid into each of the five sterilised plastic bottles and then siphon the 23 litres of gold equally into them. The sugar will keep the suspended yeast alive, the majority of the old yeast will remain in the emptied bin.
This transfer out of the bin to a secondary container is called secondary fermentation. It allows the beer to become clearer and cleaner as the yeast drops out of suspension - three or four days normally does it.
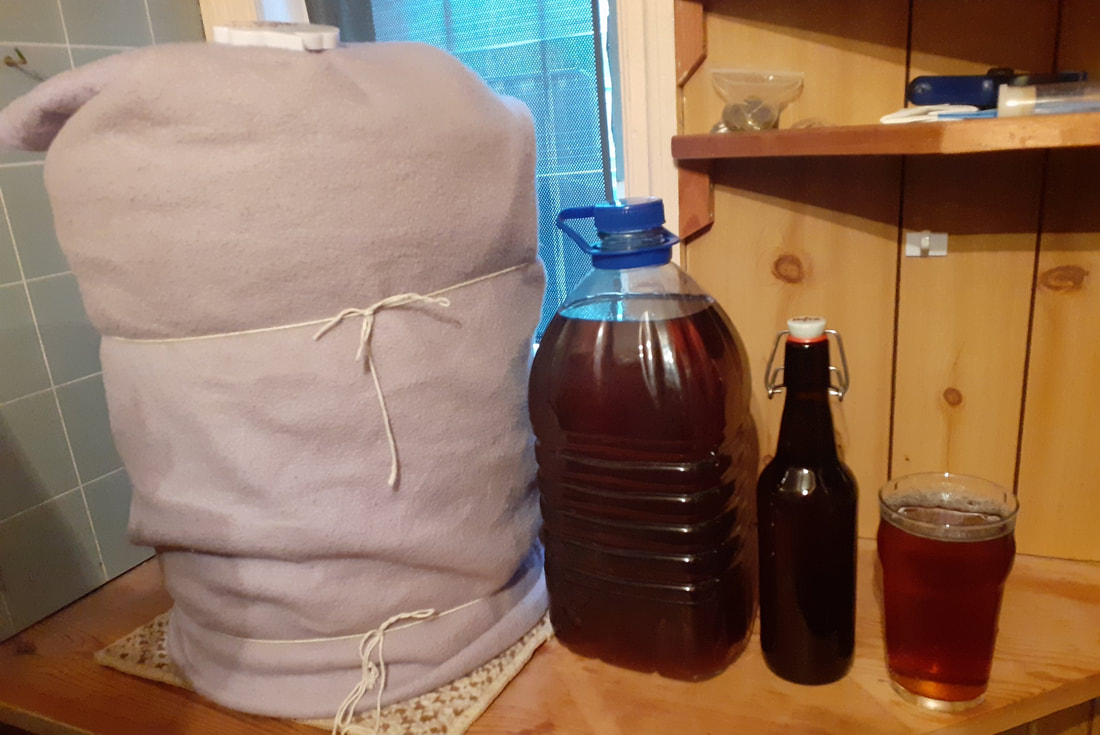
Now the final bottling can commence. I use 500ml swing top bottles which can be reused forever and sealed with ease, so much better than the capping method. I fill nine 500ml bottles from one 5 litre plastic bottle so a grand total of 45 bottles of great gingery garlic 'super health' beer.
Each 500ml bottle has half a level teaspoon of dissolved sugar added before filling - I use 4.5 level teaspoons of sugar in a quarter cup of boiled water and distribute evenly into the nine swing top bottles, this is known as priming sugar and it enables a bit of fizz to be naturally compressed into the beer whilst it's bottled.
When the bottles are filled leaving a 40mm gap at the top, I seal them, hold horizontally and rock them like a see-saw five times, unseal them and let the gas out. Altogether I do this five times and it extracts the suspended CO2 from the beer and it fills the gap at the top of the bottle as CO2 will sit on the beer surface as it's heavier than air.
Seal the bottles and wash in water as you'll get mould around the seal if you don't. The bottled beer will improve in flavour and clarity in a week or as long as you can wait.
This process is known as 'live bottling' as the yeast wasn't chemically killed off with sulphites. It's so much better than forced carbonation - which tastes of chemicals and has way too much gas in. You'll have a small amount of yeast in the bottom of the bottle, it's harmless.
People that laugh at home-brew and say it's cloudy junk are very wrong, this is fake news based on someone who knew someone that had a go at brewing something once and created a foggy faux-pas. You just have to be thorough, be inventive and be patient.
